

In this guide, we’ll walk you through the process of changing your Soulmask Server settings. Whether you're a beginner or an experienced server owner, this tutorial will help you adjust your server's configuration to fit your desired gameplay style.
What Soulmask Server Settings Are Available?
Soulmask Servers offer a wide range of settings that allow you to customize your server to your exact preferences. These include basic options like server name, player limits, and password protection, as well as more advanced configurations like resource spawn rates, enemy difficulty, and event frequency. You can also adjust gameplay mechanics such as loot tables, weather cycles, and PvP or PvE modes to create the perfect environment for your players. Understanding these settings will give you full control over how your Soulmask Server operates.
Why Customize Your Soulmask Server?
The GM (Game Master) Menu is a powerful tool for customizing your Soulmask Server in real-time. It allows you to adjust server settings, spawn items, control weather, and manage player permissions without needing to edit configuration files manually. By using the GM Menu, you can quickly make changes during gameplay, ensuring a smoother and more dynamic experience. Whether you’re balancing difficulty, managing events, or testing new features, the GM Menu gives you the flexibility to optimize your Soulmask Server effortlessly.
How To Change Soulmask Server Settings
Changing your Soulmask Server settings is essential for creating an optimal gaming experience. Using the GM Menu, you can easily adjust configurations in real time, allowing you to tailor gameplay to your community’s needs. Below are the steps to guide you through the process of modifying these settings effectively.
Step 1: Open the GM Menu
To access the GM Menu, press the tilde (~) key to open the command line while in-game. Then, type in the following command:gm key password123
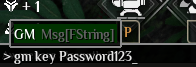
Note: Replace password123 with the password you set in the Startup tab under the ADMIN PASSWORD field. For detailed instructions on changing your Soulmask Server settings, you can also refer to our knowledge base.
Step 2: Navigate to Server Settings
Once you’ve entered the GM command, the GM Menu will appear. Navigate to the "Open Coefficient Settings" section to view all available configuration options for your Soulmask Server.
Step 3: Adjust Desired Settings
In the "Server Settings" menu, select the options you want to modify. For example, change spawn rates, toggle weather settings, or adjust player permissions by clicking on each item and entering new values.
Step 4: Apply Changes
Once your adjustments are made, select "Apply" or "Save" within the GM Menu. These changes will take effect immediately without requiring a server restart.
Step 5: Test and Verify
After applying the changes, exit the GM Menu and test the new settings in-game. Monitor the server to ensure everything is working as intended, and return to the GM Menu if further adjustments are needed.
Advanced Server Customization Options
Advanced server customization enables you to fine-tune your Soulmask Server for a unique gameplay experience. By modifying features like resource spawn rates, enemy behavior, and special events, you can tailor the environment to better suit your players’ preferences. Here are some advanced customization options you can modify for your Soulmask Server.
- EXP & Growth
- Adjust the experience points (EXP) awarded for various actions.
- Modify growth rates for resources and items, enhancing or slowing down player progression.
- Drops
- Customize loot tables to change what items drop from enemies or containers.
- Set drop rates for specific items to make rare finds more attainable or harder to get.
- Building
- Modify building restrictions, allowing for greater construction freedom or limiting certain structures.
- Adjust building costs, such as resource requirements for crafting or upgrading structures.
- Enemy Behavior
- Alter AI difficulty, making enemies more challenging or easier to defeat.
- Customize spawn rates and types of enemies to create unique combat scenarios.
- Events
- Schedule in-game events, such as special raids or seasonal activities, to engage players.
- Customize the frequency and rewards for these events to encourage participation.
- Weather and Environment
- Adjust weather patterns and effects, impacting gameplay dynamics.
- Change environmental conditions, such as day/night cycles and resource availability.
- Player Permissions
- Fine-tune permissions for different player roles, controlling what actions they can perform.
- Enable or disable specific commands for players or groups to enhance gameplay balance.
These options can help you create a tailored experience that keeps players engaged and coming back for more!
Discover Soulmask Server Hosting From Pine Hosting
Unlock the full potential of your gaming experience with Pine Hosting's Soulmask Server hosting. Our reliable and scalable solutions ensure that you can customize your server to meet the needs of your community while enjoying optimal performance and minimal downtime. With user-friendly setup, robust support, and powerful features, Pine Hosting is your ideal partner for creating and managing your Soulmask Server. Explore our offerings and elevate your gaming experience today!
Conclusion
Customizing your Soulmask Server is essential for creating a tailored gaming experience that meets the needs of your community. By understanding and utilizing both Soulmask admin commands and advanced server settings, you can enhance gameplay, improve player engagement, and ensure a stable environment. With the tools available through the GM Menu and the support of Pine Hosting, you have everything you need to optimize your server. Start making adjustments today, and watch your Soulmask Server thrive!