

If you love playing Minecraft, you might want to try hosting your own Minecraft Java server!
But how do you get started?
Don’t worry – it’s easier than it sounds! In this blog, we’ll show you how to set up your very own Minecraft Java server, step by step. Let’s get your server running and start having fun!
What Is Minecraft Java Server Hosting?
Minecraft Java Server Hosting is the process of running a Minecraft server on your own computer, a dedicated server, or by using a hosting service to let you and your friends play together in the same world. You can set up your own Minecraft server to control the game settings, mods, and rules however you like.
When you host your own server, you can either run it directly from your computer or rent a server from a hosting provider. Running it on your own computer means you’re the one in charge, but if you want the server to always be online and avoid performance issues, using a hosting service can be a great option. Hosting services provide powerful servers that are always running, so you can play anytime without needing to keep your PC on all the time.
No matter how you host it, Minecraft Java Server Hosting allows you to customize your game and invite friends to join your world, whether you’re playing survival, building in creative, or even creating minigames!
Why Host Your Own Minecraft Java Server?
Hosting your own Minecraft Java server gives you full control over your game and the freedom to customize it however you want. Here are a few reasons why it’s awesome to host your own server:
Complete Control
When you host your own server, you make the rules. You can change game settings, install mods, or add plugins to make the experience unique. Whether you want to play hardcore survival or run custom minigames, you decide what happens in your world.
Private Gameplay
Hosting your own server means you can choose who joins. It’s great for playing with your friends without random strangers joining or disrupting your game. You can create a private, safe space where you control who has access to your world.
Customizable Settings
From adjusting the difficulty level to changing the spawn points, hosting your own server allows you to tweak every little detail. You can even install custom mods and plugins that add new features, blocks, or even whole new game modes, making the game feel fresh and exciting.
Lag-Free Experience
If you’ve ever played on public servers with lots of lag, hosting your own server can fix that. By running the server on your own machine or a dedicated server, you can reduce connection issues and have smoother gameplay, especially if you’re playing with friends on a fast, local network.
Always On
If you host your server on a powerful machine or rent a server from a hosting provider, your Minecraft world is always up and running. This means you and your friends can hop on and play whenever you want without worrying about the server being offline.
In short, hosting your own Minecraft Java server gives you the flexibility to play the game your way, with no limits on what you can create or how you play!
Types of Minecraft Java Server Hosting
There are a few different ways you can host your Minecraft Java server, depending on what works best for you. Here’s a breakdown of the different types of Minecraft Java server hosting:
Self-Hosting (Your Own Computer)
Self-hosting means you run the server directly from your own computer. This is a great option if you want complete control and are just playing with a few friends.
You’ll need a decent PC to handle the server and Minecraft at the same time. While this is cost-effective (since you’re using your own machine), it does have its downsides, like needing to keep your computer on all the time and possibly running into performance issues if your hardware isn’t powerful enough.
Dedicated Server Hosting
A dedicated server is a "powerful computer" that’s built specifically for hosting Minecraft. This option is ideal for larger groups of players or if you want to run a server with many mods and plugins.
Dedicated servers are usually hosted in data centers, meaning they are always on and have a super-fast internet connection. While it’s more expensive than self-hosting, it gives you more resources, better performance, and higher uptime, making it perfect for more serious Minecraft communities.
Minecraft Server Hosting Provider
These are companies that provide easy-to-use, ready-made Minecraft server hosting solutions.
Hosting services are perfect if you want a hassle-free experience. You don’t have to worry about setting up anything yourself – everything is done for you, and you can get started right away. Hosting services typically offer different plans depending on the number of players, plugins, and performance you need.
Each type of hosting comes with its own pros and cons, so it’s important to choose the one that best fits your needs and budget. Whether you want a simple setup or a more powerful server, there’s an option for you!
Key Features To Look For In A Minecraft Java Hosting Provider
When choosing a Minecraft hosting provider for your Java server, it’s crucial to pick one that provides the right specs and features for a smooth, lag-free experience. Here are the key features to consider:
High Performance
When choosing a Minecraft hosting provider, it’s important to pay attention to the server’s performance, especially the CPU, RAM, and storage. These are the core components that determine how smoothly your server will run, especially when handling large worlds, many players, or mods.
By ensuring your hosting provider offers the latest CPU, fast RAM, and fast SSD storage, you'll have a server that runs smoothly and efficiently, providing the best experience for you and your friends.
Reliable Uptime
To keep your server running smoothly, look for a hosting provider that offers high uptime guarantees—99.9% is the standard. This means your server will be online and available almost all the time, so you and your friends can enjoy uninterrupted gameplay.
Easy-to-Use Control Panel
A good control panel makes it easy to manage your server, adjust settings, and install plugins or mods. The best providers offer simple, intuitive control panels that don’t require advanced technical knowledge. This feature is especially important for beginners who want a hassle-free setup.
Customer Support
Technical issues can pop up at any time, so it’s important to choose a hosting provider with reliable customer support. Look for 24/7 support via live chat, email, or Discord, so you can get help whenever something goes wrong with your server.
Security Features
Security is a critical aspect of server hosting. Make sure your provider offers DDoS protection to guard against attacks that can crash your server.
Additionally, regular backups are essential to ensure that if anything goes wrong, you can restore your server to a previous state.
By keeping these factors in mind, you can choose a Minecraft Java hosting provider that offers excellent performance, control, and support, helping you create the best server possible for you and your friends
Setting Up A Minecraft Java Server
Now, I’ll show you how to manually set up a Minecraft Java server on your PC (Windows OS). Don’t worry if this seems like a lot – it’s actually easier than it sounds!
I’ll walk you through the steps for setting up everything yourself, and by the end, you’ll have your server up and running.
And don’t worry – for those who prefer an easier route, I’ll also show you a simpler way at the end, so continue reading!
1. Download Minecraft Server Software
First, you'll need to download the official Minecraft server software. You can get this from the official Minecraft website:
- Go to the Minecraft website and download the latest version of the Minecraft server software (it will be a
.jarfile).
2. Install Java
Minecraft Java Edition requires Java to run. If you don't already have it installed, you'll need to download the latest version of Java:
- Go to the Java Download Page and follow the instructions to install Java.
- Once Java is installed, open a Command Prompt and type
java -versionto ensure it was installed correctly. If it shows a version number, you're good to go.
3. Prepare Your Server Folder
Next, create a dedicated folder on your computer where you’ll store all your server files. You can name it something like "Minecraft Server" for easy access.
- Move the
.jarfile you downloaded into this folder.
4. Create a Batch File to Run the Server
Now, you need a batch file to launch your Minecraft server. This will tell your computer how to run the .jar file with the right amount of memory. Here's how:
- Open Notepad and paste the following code into the text editor:
@echo off
java -Xmx1024M -Xms1024M -jar minecraft_server.jar nogui
pause
This code tells the server to use 1024MB (1GB) of RAM. You can increase the numbers (e.g., -Xmx2048M) if you want to allocate more memory for your server (recommended for larger worlds or more players).
- Save the file as
start.batin the same folder as theminecraft_server.jarfile.
5. Run the Server
Double-click the start.bat file you just created. This will launch the server, and the command prompt window will open. The server will start to generate the necessary files, including a eula.txt file.
6. Accept the EULA
After running the server for the first time, you’ll need to accept Mojang’s End User License Agreement (EULA) before you can continue.
- Open the
eula.txtfile that was created in your server folder. - Change the line
eula=falsetoeula=true. - Save and close the file.
7. Start the Server Again
Once you’ve accepted the EULA, double-click the start.bat file again to run the server. This time, the server should start up and generate the world files. You’ll see a message that says "Done" in the command prompt, meaning the server is ready.
8. Configure Server Settings
Now that your server is running, you can configure it by editing the server.properties file in your server folder. This file lets you adjust things like:
- Game mode (Survival, Creative, etc.)
- Maximum number of players
- World settings (such as seed, difficulty, and whether PvP is enabled)
Just open the server.properties file with Notepad, make your changes, and save the file.
Your server is now online, but for it to stay online, your computer needs to be on 24/7. If you don’t want the hassle of choosing Java versions, downloading, uploading files, or keeping your PC running all the time, we have the perfect solution for you...
Navigate Minecraft Java Server Hosting With Pine Hosting
With Pine Hosting, you can say goodbye to manual downloads and file uploads. There's no need to keep your computer running 24/7 either. Simply choose the Minecraft version that fits your needs, and we'll take care of the rest. We offer a wide selection of versions, so you can pick the one that works best for you.
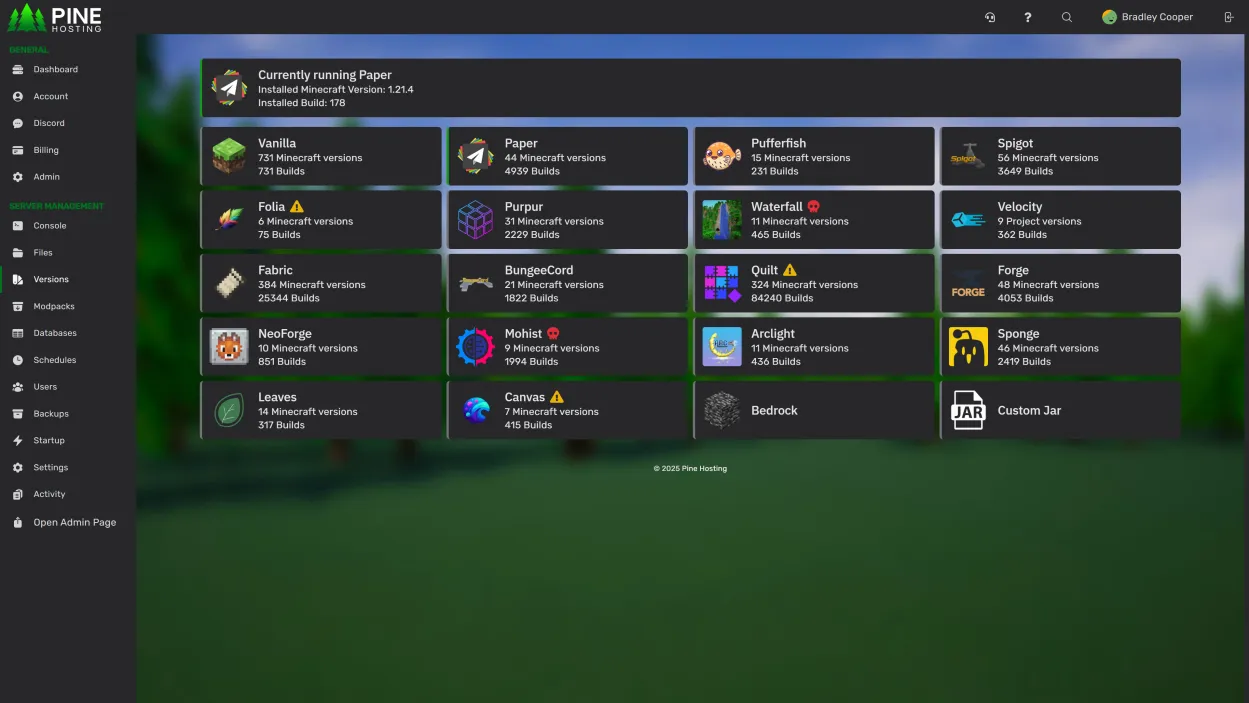
Here's what you can expect with Pine Hosting:
- High Performance: Enjoy lag-free gameplay with top-tier hardware and optimized performance.
- 24/7 Support: Our dedicated team is available around the clock to assist you with any issues or questions.
- Instant Deployment: Get your server up and running in no time with our fast and easy setup process.
- User-Friendly Interface: Managing your server is a breeze with our intuitive control panel.
- DDoS Protection: Play with peace of mind knowing your server is safeguarded against DDoS attacks.
- 99.99% Uptime: Your server stays online and accessible with our near-perfect uptime guarantee.
Pine Hosting makes it easy for you to focus on playing while we handle the technical side. Enjoy a hassle-free, premium Minecraft server hosting experience at an affordable price!